From the design to a real app
You have created the desired design. What do you do now? How can you use it in a real app?
Here is a small guide describing you further steps.
HTML Page Setup
1. Download DHTMLX code files
To use the created design in an app, you should include code files of the related DHTMLX components to your HTML page. If you have dealed with many components it would be a long list. So, we reccomend to use 'dhtmlxSuite' package (you can download it here) as alternative to standalone components. In case of the 'suite' you need to include just 2 files - dhtmlx.js and dhtmlx.css.
After you have downloaded the package you should unzip its content to the [YOUR APPLICATION ROOT]/codebase folder.
If it's your first encounter with the library or you have any problem at this stage, please, refer to the 'Preparation' chapter of the basic start tutorial 'DHTMLX. Start Building Web Applications Today'.
2. Create an HTML file
In the root folder of your application, create a file 'index.html' with the following initial code:
<!DOCTYPE html>
 <head>
    <script src="../codebase/dhtmlx.js" type="text/javascript"></script>
    <link rel="STYLESHEET" type="text/css" href="../codebase/dhtmlx.css">
    <style>
        /*these styles allows dhtmlxLayout to work in the Full Screen mode in different browsers correctly*/
        html, body {
           width: 100%;
           height: 100%;
           margin: 0px;
           overflow: hidden;
           background-color:white;
        }
   </style>

    <script type="text/javascript">
      window.onload = function(){
          //Here you'll put code of your application
      }
    </script>

 </head>
 <body>
 </body>
</html>
Integrating the created design into the page
Here your step will very depending on the Visual Designer version you are using: desktop or online.
Online version
To integrate the design:
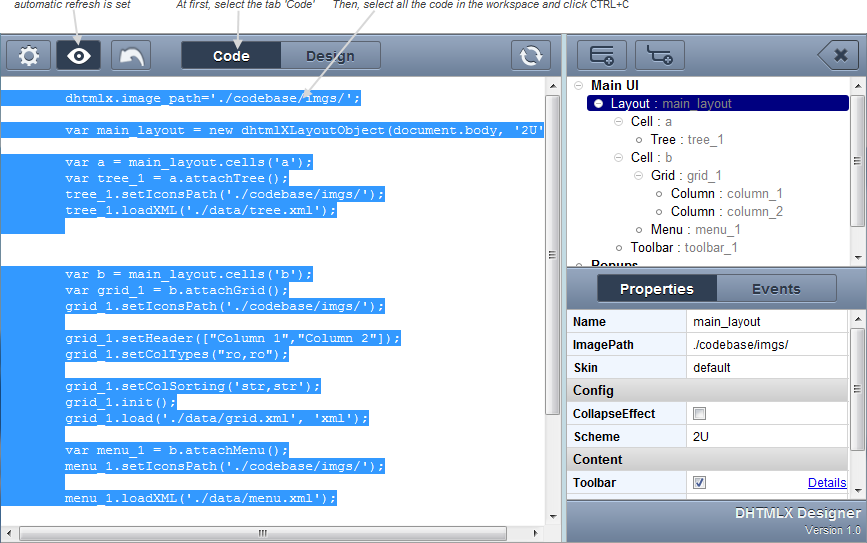
- From the toolbar select the tab 'Code'. In the workspace you'll see full code of the design.
- if automatic refresh isn't set, refresh the design to ensure that the code has last updates (instructions).
- Select all the code and press CTRL+C.
- Activate a window with your HTML page, put the cursor in the place, marked as 'Here you'll put code of your application' in the code snippet above, and press CTRL+V.

Desktop version
To integrate the design:
- From the toolbar press
 . A drop-down menu will appear.
 - In the drop-down menu select SaveAs.
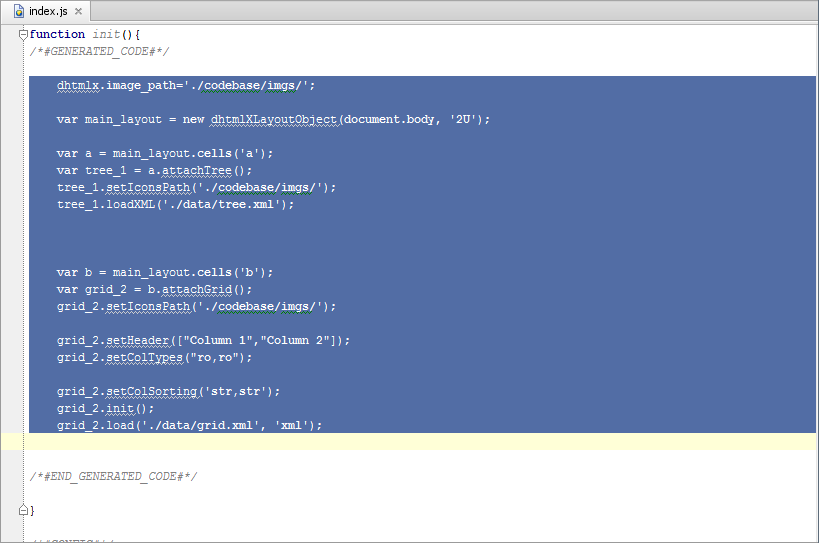
- After, you'll be asked by browser about the place where to save the index.js file. Choose the location and click the button Save.
- Open the saved index.js file in an editor.
- In the index.js file, select the code from the region #GENERATED_CODE# and press CTRL+C.
- Activate a window with your HTML page, put the cursor in the place, marked as 'Here you'll put code of your application' in the code snippet above, and press CTRL+V.

Now, regardless of version you are using, the <head> block of your HTML file will look as:
<head>
    <script src="../codebase/dhtmlx.js" type="text/javascript"></script>
    <link rel="STYLESHEET" type="text/css" href="../codebase/dhtmlx.css">
    <style>
        /*these styles allows dhtmlxLayout to work in the Full Screen mode in different browsers correctly*/
        html, body {
           width: 100%;
           height: 100%;
           margin: 0px;
           overflow: hidden;
           background-color:white;
        }
   </style>

    <script type="text/javascript">
      window.onload = function(){
        dhtmlx.image_path='./codebase/imgs/';

	var main_layout = new dhtmlXLayoutObject(document.body, '2U');

	var a = main_layout.cells('a');
	var tree_1 = a.attachTree();
	tree_1.setIconsPath('./codebase/imgs/');
	tree_1.loadXML('./data/tree.xml');

        ...
      }
    </script>
</head>
That's all. Now you can run the HTML page and see the design inside an app.